I was looking for things to make for the animal shelter;
because I have a lot of leftover yarn and came across these projects for dogs.
Dog Coat
Pattern

Materials: Pretty fabric, Dog Measurements, 4 buttons
(If your dog has short fur, you could use Velcro instead), Bias tape, ribbon,
lace or something pretty for the edge of your dog coat.
Directions:
Dog Coat Pattern

Body
Draw a rectangle using 1/4 of your dog's chest width
measurement as height, and back length measurement as width. Draw a small curve
on the lower right corner of your rectangle. Mark 1/4 of your dog's neck width
measurement along the left side of your rectangle and draw a small curve from
here to the top of your rectangle.
Chest pattern
Make a rectangle with 1/2 of your dog's chest width
measurement as width and 4" as height (this measurement is for a medium
dog, vary it according to your dog's size). Add 2" to the width of your
rectangle. Round the corners of your rectangle.
Neck pattern
Draw a square using 1/4 of your dog's neck width measurement.
Now draw 1/4 of a circle using this square as a guide. Round the corners of
this piece too!
Cut the Dog Coat Pattern
Place the dog coat patterns on your fabric and cut them out.
Remember that the sides of your patterns that have the straight arrow should be
placed along the fold of your fabric.
For the Pocket
Cut a square to the desired size.
Cut 1 piece if you will use bias tape or a ribbon for the
edge, cut 2 pieces if you decide to line your body piece
Chest pattern
Cut 2 pieces
Neck pattern
Cut 2 pieces
Sewing the Dog Coat
Take your two chest pieces and match them with the right sides
facing each other. Sew along the edges. Be sure to leave a small opening so you
can flip them right side out. Do the same with your neck pieces.
After you sew your neck pieces together, make small cuts all
along the sides so they don't bulge when you turn them over.
Turn your strips inside out and sew along the edges.
Make buttonholes or add Velcro on the ends of your strips
Now take your body piece and place it on top of your dog.
Place your neck and chest pieces where you want them to be and pin them down.
Make a mark on your body piece where the neck and chest pieces
should go. If you are using buttons, make the marks on the buttonholes. If you
are using Velcro, mark the end of your strips.
Sew the Velcro or the buttons on to the body piece
Add a decoration to your body piece. Finish
the edges of your body piece. For this you have several options:
Line it with another fabric
Add bias tape or a pretty ribbon to the edge
Use a serger stitch for a grunge unfinished look
Fasten the neck and chest pieces where they should go.
Dog Toys
for Heavy Chewers
Materials:
Zip Tie, four different colored popes
Directions:
Finding center of two lengths of rope.
After locating the middle of each rope, cross each rope at
right angle to other rope.
Secure with small Zip Tie
Then use a small zip tie to secure to the two lengths together
at the centers.
Begin the knot
Lay crossed ropes over fisted hand with thumb extended.
Loop around thumb

Picture of Loop around thumb
Loop first rope around thumb and over second rope, using thumb
to hold first rope in place Step 6: Loop Second Rope
Loop second rope over first rope and go over rope three, using
thumb to hold in place.
Loop third rope
Loop third rope over second rope and go over forth rope, use
thumb to hold third rope in place.
Loop fourth rope
Loop fourth rope over third rope and then insert fourth rope
into loop created by first rope.
Tighten up Loops
Tighten each rope by pulling the tail of each rope.
Continue to tighten loops
Pull all ropes tight until a small four section knot is
created.
Trim off zip tie
Trim off zip tie tail, and place knot with zip tie side facing
up.
Repeat steps 5-9
Repeat steps 5-9. Loop first rope around thumb and over second
rope.
Repeat steps 5-9
Repeat steps 5-9. Loop second rope over first rope and over
third rope holding in place with thumb.
Repeat steps 5-9
Repeat steps 5-9. Loop third rope over second rope and over
fourth rope holding in place with thumb.
Repeat steps 5-9
Repeat steps 5-9. Loop fourth rope over third rope and feed
tail of fourth rope into loop created by first rope.
Tighten up all Ropes
Continue to tighten up all ropes pulling together to form a
four section tight knot.
Tightened Knot
Tightened knot shown here from above and side view.
How to Make a Super-Quick Dog Toy

Materials: Fleece strips (up to six colors can be used)
Directions:
Gather your fleece and cut your strips. Mix and match your
scraps to make a colorful toy.
Holding all three (or six) strips together, tie them in a knot
at one end. Begin to braid the long strips of fleece. If using six strands,
hold the strands together in sets of two while you are braiding.

To make a basic braid, pull the left-most strand (blue) over
the center strand (pink) and tug tight. Next, pull the right-most strand
(multi) over the now center strand (blue) and tug tight. Continue braiding in
this manner, braiding the fleece as tightly as possible for a sturdy toy.
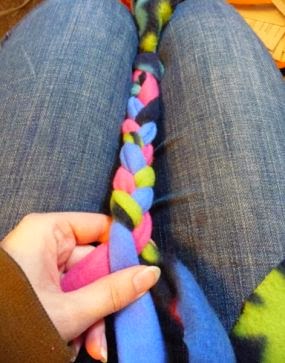
The easiest way to get a really tight braid is to put the knot
between your knees and keep braiding. Braid until the toy is slightly longer
than your desired length and tie the other end in a knot.
Trim the ends of the fleece and your toy is finished! If you'd
like to give your pal another place to grab on to the braids, just tie a few
knots in the finished braid.
No comments:
Post a Comment