Here's a
clever woodworking project to help kids manage their growing collections of
favorite movies, video games, and music. This custom carrier serves as both a
dresser-top shelf and a portable box for transporting DVDs from room to room --
or even taking them on vacation. You might also want to check out our
Lean-on-Me Multi-Media Holder
Cache-and-Carry
Multi-Media Holder

Materials: 8-foot-long section of (1 by 6) pine
board, Saw, Drill, 1 5/8-inch drywall screws, 100-grit sandpaper, Primer, Paint,
and Decorative handles
Instructions:
Cut
the following pieces from the 8-foot pine board:
Two 16 1/2-inch sides
Three 8-inch back pieces
Two 11-inch ends
Two 16 1/2-inch sides
Three 8-inch back pieces
Two 11-inch ends
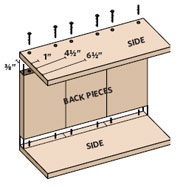
In
each side piece, drill six 1/8-inch holes for the drywall screws, as shown.
Then screw the sides to the back pieces.

Set
the assembled pieces upright, then center an end on top and screw it in place,
pre-drilling 4 holes. Attach the other end in the same way.
Use
sandpaper to slightly round the edges of the wood. Then prime and paint the
holder. When it's dry, attach decorative handles to the ends.
Make a Scene

Materials: Roller and synthetic paintbrushes, Blue
eggshell or semi-gloss latex paint, Pencil, Painters' tape, Black and green
latex chalkboard paint (we used Rust-Oleum brand) and Red and brown acrylic
paint
Instructions:

Cover
the wall with a base coat of the blue paint and let it dry thoroughly. Next,
lightly pencil a hilltop house design on the wall. For the best results, draw
basic shapes, such as a triangular roof, square windows, and a round treetop.
Apply
a border of painters' tape around the driveway and street areas. Brush on black
chalkboard paint and let it dry thoroughly (4 or more hours). Apply a second
coat if needed. Remove the tape. Following the same method, paint the grass and
treetop with green chalkboard paint and let it dry.
Use
painters' tape to outline the house and cover the windows and door. Now paint
the house red and the tree trunk brown. When the house is dry, remove the tape,
and then mark off the roof with tape. Finally, fill in the roof, windows, and
door with black chalkboard paint.
Let
the finished scene cure for 3 full days. Then condition the chalkboard surfaces
by rubbing them with chalk (sidewalk chalk held sideways works well).
Vigorously rub the chalk into the surfaces with an eraser, towel, or rag to
season them before ultimately wiping them clean with a dry cloth. This process
will help prevent erased drawings from "ghosting" through. After 7
days, you can clean the surface with a damp cloth, if desired. Just be sure to
recondition the surface after each wet wiping.
Tips:
A soap dish mounted
to the wall serves as a handy tray for holding chalk.
Homemade
Stained Glass

This convincing technique makes use of
thickened tempera paint to evoke stained glass. After transforming your
windows, the material cleans up with little more than soapy water.
Materials: Cornstarch, Tempera paint in several
colors, including black, Liquid dish detergent, Mixing bowls and stirrers, Funnel,
Plastic squeeze bottle , Old sheet or drop cloth, Newspaper and painter's tape
(optional), Paintbrushes, and Plastic spatula
Instructions:
For
each color of paint, combine 1/4 cup cornstarch, 1/4 cup paint, and 1 teaspoon
of dish detergent in a bowl and stir until the mixture is the consistency of
yogurt.
Use
the funnel to pour the black paint into the squeeze bottle.
Cover
the floor beneath a clean glass door or window with the sheet or drop cloth. To
avoid potential stains, cover any exposed wood with newspaper and painter's
tape.
Use
the paintbrushes to paint a picture on the window.
Let
the paint dry and then use the squeeze bottle to carefully outline the shapes
with black paint, creating a stained glass effect. Add more black lines as
desired.
When
you're ready to remove the artwork, use a plastic spatula to scrape off the
paint, and then wash away any remaining streaks with warm soapy water.
Share your ideas on this or anything here on the blog either
here or e-mail me at stipple@verizon.net. I look forward to hearing from you!