The first two
projects use a 1,000 pieces of puzzles.
I go to yard sales and buy puzzles that do not have all the pieces; this
way you get them cheap and as you are aware I love to upcycle.


Materials: Grey-board (cereal box cardboard), Glue,
Pieces from a 1000-piece, puzzle, White
Gesso or other primer, Acrylic paints, Glitter glue, 1/8" ribbon and Sponge
paint brush
Directions:
MAKE
BASE

Cut
a rough Christmas Tree shape out of grey-board.
ADD
PUZZLE PIECES

Glue
down your first layer of puzzle pieces and allow to dry completely.

Paint
the puzzle pieces and the base with Gesso.
Note: Use a sponge brush and stippled
the Gesso onto the tree to give it some texture.
Repeat
this process until you're happy with the appearance of your tree.
Note: A total of 3 layers on the tree.
Paint
a final coat of Gesso over the entire tree.
PAINT

Paint
the tree green and the trunk brown.
Add
a thick layer of matching glitter glue.

Glue
a ribbon hanger to the back of the ornament.
FINISHED!!
SNOWFLAKE
VERSION
For
this snowflake version, glue 3 puzzle pieces evenly spaced from one another
onto a grey-board circle. On top, add
another 3 puzzle pieces centered between them, which formed the perfect snowflake!
Paint
the snowflake with Gesso and added glitter glue and then attached the ribbon
hanger and was finished!!
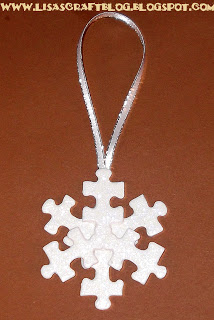
Second Puzzle Piece
Snowflake Ornament

Materials: Old Puzzle Pieces, Paint, Craft Glue,
Collage Pauge, Glitter, Ribbon, Jingle Bell, Paint Brush and Scissors
Directions:
Start off by painting your puzzle pieces. For my snowflake,
paint 6 white puzzle pieces. You can use as many as you like. Let the paint
dry.
Arrange the white puzzle pieces until you get a snowflake
design you like. Glue the pieces together. Be generous with the glue. Once the
glue is dry, flip your snowflake over and add more glue where the pieces join
together just to make it a little stronger.
Now we need to get the snowflake ready for the glitter. Coat
my snowflake with Collage
Pauge, but you can also use thinned glue. Use a paint brush to
apply a coat of glue to the front of the entire snowflake.
Place your snowflake on a piece of paper and generously coat
it with glitter. Pat the glitter onto the snowflake, then pick it up and gently
shake off any extra glitter onto the paper. You can then carefully pour the
glitter back into the container. Let the glue dry.
Now you should cut a piece of ribbon about 8- to 10-inches
long.
Take a piece of ribbon, fold it in half, and glue the ends to
the top back of your snowflake. This will be your loop for hanging the
ornament.
For finishing touches to my snowflake, use a piece of ribbon to
make a bow and added a jingle bell. Feel free to use whatever you want to
embellish your snowflake. Once all of the glue is dry, hang up your ornament
and enjoy!
Share your ideas on this or anything here on the blog either
here or e-mail me at stipple@verizon.net. I look forward to hearing from you!
No comments:
Post a Comment