These you can give a gifts or new ornaments for the tree.
I Heard the bells Ornament

Materials: Package of Jingle
bells, green yarn, 3 inch embroidery hoop
Directions:
Cut off a piece of yarn that is 3 to 4 yards long. Tie one end to the embroidery hoop, leaving a tail of an inch or two. Add a bit of tape to the other end to make it easier to string the bells on. See below:

Start wrapping the embroidery hoop with the
yarn, and then add a bell. Wrap it in such a way that the bell goes in the
center of the hoop. See
below:

Continue wrapping and
adding bells along the way. Picture shows eight but it depends on the hoop size.

When you get to the
end, wrap the yarn a few times around the metal bracket and secure with a knot.
Use the extra yarn to tie a loop for hanging.
Option: Same can be done on
headband.
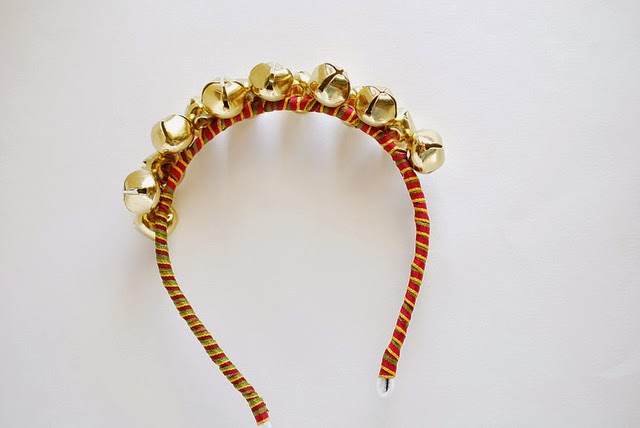
Wrapped it with ribbon, and then added bells at
the top to form a crown.
Sweet little Jesus Boy Felt Ornaments

Materials: Felt – Teal, Green, Tan, White; scissors;
embroidery thread – same colors as the felt; Needle; Pinking or Scallop Shears
Directions:
Sweet Little Jesus Boy Pattern PDF
Directions:
Sweet Little Jesus Boy Pattern PDF

Embroider the details onto the face and body, and
then lay them out.

Stitch the layers down to the top backing piece,
working your way up to the top.
When the entire applique is finished, stitch the front backing to the back using a running stitch.
When the entire applique is finished, stitch the front backing to the back using a running stitch.

Flip the ornament
over and stitch through only the back layer with a length of embroidery floss.
Tie the ends together and trim to form a hanger.
Winter Wonderland Felt Ornament
Winter Wonderland Felt Ornament

Materials: Wool Blend Felt – Blue, Pink, White ; Embroidery Floss (I
used DMC 598, 151, B5200 and 310); Needle; Scissors; Pinking or Scallop Shears
(optional)
Winter Wonderland Pattern PDF
Directions:
Cut out the snowflake shape, plus the two backing pieces, using pinking shears on the smaller piece if you want.

Embroider the details onto the snowflake using
two strands of embroidery floss.

Stitch the snowflake onto the smaller backing
piece with tiny stitches along the edge. They should be nearly invisible!
Stitch the front onto
the larger backing. Use thread that matches the back so that the stitches don't
stand out. For this one, use colonial knots to hold this together. Although
they are usually more decorative, they work in a functional manner too!

Take a stitch through
the back layer only, and then tie the thread ends together to form a hanger.

Hang your snowflake
on some garland, etc.
Share your ideas on
this or anything here on the blog either here or e-mail me at stipple@verizon.net. I look forward to hearing from you!
No comments:
Post a Comment