I fell in love with the minion form Despicable me when it came
out. I like the ones with one eye and hair. Not until recently, when my youngest
order a DVD which has some short minion snip-its. My favorite one was about one
minion took out a banana and the two other minion chases him to get the banana.
I never thought about it before but they do look like bananas.
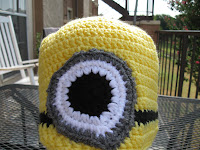
The first one I crochet apparently was for a child. See below picture, The pattern is also below, too.
Hat:
Start off with an adjustable ring, and 13 dc in ring.
Round 1: ch 3 (counts as first dc), dc in same st as ch 3, dc
twice in each dc around, sl st in third ch. {26}
Round 2: ch 3 (counts as first dc), dc twice in next dc, (dc
in next, 2 dc in next) around, sl st in third ch. {39}
Round 3: ch 3 (counts as first dc), (dc twice in next dc, dc
in next 2 st) around, sl st in third ch. {52}
Round 4 - 8: ch 3 (counts as first dc), dc in each st around,
sl st in third ch. {52}
Round 9: Change color, ch 3 (counts as first dc), dc in each
st around, sl st in third ch. {52}
Round 10 - 11: Change color, ch 3 (counts as first dc), dc in
each st around, sl st in third ch. {52}
Round 12: Turn hat so that the right side is facing out. ch 1,
sc in each st around, sl st, and finish. {52}
Eye:
{White Part} - In an adjustable ring, make 17 tr, sl st into
beginning ch and fasten off.
{Black Part} - In an adjustable ring, make 9 sc, sl st into
beginning ch and fasten off.
{Grey Part} - Round 1: In an adjustable ring, make 17 tr, sl
st into beginning ch,
Round 2: ch 1, sc around in each st, sl st.
Round 3: ch 1, sc around in each st in FRONT LOOP ONLY, sl st
and fasten off.
Sew all of the pieces together, and onto the hat.
To make the hair pieces, I pulled up a strand of black yarn
around one of the dc and tied it in a knot. Then cut to an appropriate length.
You can do this as little or as many times as you'd like.
Adult Minion Attempt One:
The next one I did, I took that same pattern; but, used a “J”
and three row of the black and five rows of the yellow after that and ended
with a row of single crochet. The eye with
black I crochet two rows of double crochet’ then with the white did one double
crochet doing two in each dcl and row of single crochet. Finishing off with grey single crochets around
and leaving about enough yarn to use a tapestry needle to sew it to the hat. As you can see from the picture the ete is kind
of too big.
The third minion hat I used again a “J” hook and did basic
beanie pattern; but, added a row of 5 DC the 2 DC around and then did 9 rows of
DC around. Black row did one DC and then did one row of SC. In
yellow, I did four rows of DC followed with one row of SC. The eye was done the
same for this one and the next one. Starting off with black did row of DC in
the ring then two DC in each dc around. Change color to white and did 2 SC in
each dc below; then row of SC and then changed to the grey and did row of 2 SC
in each SC below. Again end off with enough yarn to sew the eye to the hats.
The final one I used an “I” hook and did you basic beanie
pattern and followed the first pattern after that did 10 row of DC around. Change to black and do one row of DC. Again
change to yellow and did two rows of DC and finished with one row of SC as the
original (first) pattern.
The last eyes that I did; that where exactly the same and they
worked out great. On all hats I cut 6 to 8 strands of black yarn about 3 inches
long and tie them randomly on the top and then trimmed to about a ½ inch.
My final though is: if
you want it for an adult size hat use “H” or “I” hook and follow your basic
bean and then add rows. Usually for “H” hook I make sure from the center it
measures 6” in size and for the “I” hook again from the center it measures 71/2
to 8 inches in size. Then change to
black and do a row of Dc and a row of SC; changing back to yellow and do 2 rows
of DC and the one row of SC.
Share
your ideas on this or anything here on the blog either here or e-mail me at stipple@verizon.net. I look forward to hearing from you!


No comments:
Post a Comment