Summer is the time for new babies and weddings.
Remember it only take cold weather to get the snuggling to happen which
we all know what it leads to.
Bonnet

Materials: Bonnet Pattern (click 'download',
then print it) , 2
fat quarters of fabric, lightweight fusible interfacing, and 2 buttons
Directions: Cut out the pattern.Iron your fabric and
then fold each in half, right sides in. Lay the pieces on top of each other
with your folds lined up. Pin your pattern through both fabrics and cut. Seam
allowances are included, so cut right on the line. Fold a piece of interfacing and
cut one pattern piece from that, too. You should have three pattern pieces now.

Make the straps. Choose which fabric
you want your straps to be. Cut two straps from your scraps, 2.5" x
15" (length and width isn't super important, so if you only have enough
for 2.25" x 13" strips, go with it. Mine ended up being longer, more
like 17").
Fold each strip in
half with the right sides in, so you have two long, skinny pieces. Iron.
Take it to your
sewing machine and stitch 1/4" around one short edge (I made mine with a
point to make it a little fancier) and the long edge. Leave one short edge
open. Trim your corner if you did a point on your short edge. Turn your straps
right side out--I find a long knitting needle is helpful here. Iron and set aside.Assemble the bonnet. First, iron your
interfacing according to the package directions onto the wrong side of one of
your fabric pattern pieces. Next, lay one bonnet piece, right side up, on your
work surface. Place the other piece, right side down, on top. Place your straps inside on the straight edge,
with the short edge you didn't sew sticking out the side Fold the straps accordion-style. Pin all around. Take your bonnet to the sewing machine and sew 1/4" from
edge, all the way around, leaving a two inch gap at the back, between the
straps. Be careful not to stitch the folded straps! Turn right side out
and iron (press your open edges inside the bonnet). You may be wondering at
this point if it is ever going to look like a bonnet. It will, even though it
now resembles a jellyfish.

Finish off. Top stitching will
close up the gap you left to turn your bonnet right-side out. Once you have it
all top stitched the way you want, it is time to turn it from jellyfish to
bonnet! Pull the back sides forward onto the curved edge and pin.

You are going to be
sewing your buttons here. Sometimes it takes a little tinkering to get it *just
right*. Sew
your buttons on.
Notes: If you want to make a larger size, just add
an inch or two around the outside edges of the bonnet. I have a 6-12 month
pattern worked out, but it would require a scanner or something to get it onto
my computer because it is bigger than one piece of paper. I am not that fancy,
so you will have to work it out yourself..
Changing
Pad
Materials: 1 yard of Fusible fleece, 1 yard of PUL-polyurethane laminated fabric,
thread, sewing machine, scissors, and Wonder-Under
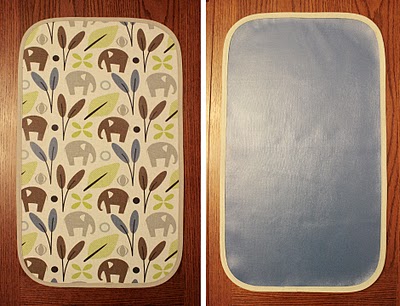
Directions: Cut a rectangle 24 x 14 out of
your top and bottom fabrics, and a slightly smaller rectangle out of Wonder-Under
(WU), about 1/8″ smaller on all sides. In this photo uses fusible
fleece so there would be a little padding. But I discovered that when it’s
folded up it’s just too bulky; so halfway through changed over to
Wonder-Under. Use a home-dec0 weight fabric (the elephants) and a blue
flexible wipe able fabric (technically called PUL-polyurethane laminated
fabric). The blue PUL is soft on one side and plastic-ey wipe able on the other
side. It’s really flexible and easily folds up without getting
crinkly or sticky like vinyl.
 Next iron the WU to
the elephant fabric then peeled of the backing. Then I placed these 2 layers on
top of the PUL and ironed the elephant side again. Three layers were fused together then trace
the curve of a bowl in each corner for rounded corners. After cutting out the
rounded corners, then stitch 1/2″ bias tape around the whole thing and that was
it! If you’re worried the fabric
layers aren’t going to stay together when adding the bias tape you may want to
stitch around the outer edges first.
Next iron the WU to
the elephant fabric then peeled of the backing. Then I placed these 2 layers on
top of the PUL and ironed the elephant side again. Three layers were fused together then trace
the curve of a bowl in each corner for rounded corners. After cutting out the
rounded corners, then stitch 1/2″ bias tape around the whole thing and that was
it! If you’re worried the fabric
layers aren’t going to stay together when adding the bias tape you may want to
stitch around the outer edges first.
Baby
Changing Kit

Finished changing pad
is about 12"by 27" long. The pocket holds one hard or soft wipes
container as well as one or two diapers.
Materials: 1/2 yard Cotton Print for the outside and pocket, 1/2 yard Chenille, Minky, or heavy Flannel; (I prefer Chenille because it is nice and thick without having to add extra batting), Thread, and Sew on Velcro,
Directions: Cut the cotton and Chenille fabric into a rectangle 13" x 35".
Lay the fabrics right sides together and pin edges well. Sew edges together with a 1/2" seam allowance leaving a 4-5" opening on one of the 13" ends; this is so you can turn it all inside out later.
*A 1/2" seam allowance is important so you can stitch the hole closed with your top stitching.
*Chenille and Minky both have a tendency to stretch a lot. Use a walking foot if you have one, it helps to guide the top and bottom layers of fabric at the same rate. If not don't worry about the stretching, keep it taught so you don't have any large folds, and again pinning well will help.
Cut excess fabric at
corners as shown in the picture to give corners a nice square edge when turned. Turn right side out through the opening and
iron the cotton side only at the edges. Pin your hole closed. Top stitch across the entire 13" end
where your hole is, using a 1/4" seam allowance. Make sure when you are
top stitching that you are using a small enough seam allowance to catch the
fabric edges of the hole and sew it shut. Turn the end that you
just top stitched up onto the inside 6 1/2" to create the pocket. Pin the
edges to keep it in place. Top stitch around the
edges of the entire changing mat with a 1/4" seam allowance. The top
stitching will stitch the ends of your pocket shut.
Now you just have to
add Velcro. Put in a wipes container and a diaper so you know how thick it will
be. (Something soft like a folded up towel that makes it 2"thick if you
don't have a wipes holder and diaper handy) I simply role my changing pad up
how I normally would, and then just pin my Velcro pieces in place where I want
them and make sure they meet. Sew on Velcro.
* You can also use a
long ribbon to make a tie-shut changing pad. Just sew two long pieces of ribbon
at the center of one end so that you can wrap the ribbon around the changing
pad and tie it. I prefer Velcro because it’s much faster and easier.
One type of Baby BIB

Finished size: 32 cm
x 25 cm
Pattern
Templates for Bib can be found here.
Materials: 3 fat quarters of quilting cotton. 0.35 m white
flannelette/flannel, 1 package of bias trim (width 12-20 mm) , Fabric scraps
for appliqué, Small piece of sew in
Velcro, Fusible appliqué webbing (such as steam a seam) thread, scissors, and
sewing machine.
Directions: Cut Fabrics.
Using bib
templates – cut out. Flannel. Pin the front upper and front lower pieces
together with the right sides facing, and stitch together. Press the seam
allowance open. Stitch the tab piece to
the front of the bib where indicated on the pattern (match up the X's). Press
the seam allowance open.
Stitch the tab piece to the
backing of the bib where indicated. Press seam allowances open.
Stitch the tab piece to the
flannel layer of the bib. Press seam allowance open.
Pin the bib front to the flannel
layer.
Apples:
Trace the apple design onto the
paper side of the fusible webbing three times. Cut around the design leaving approx.
0.5 cm clearance. Position the apples onto the wrong side of some red polka dot
fabric and press in place with an iron following the manufacturer's directions.
Cut out the apples and remove the paper backing.
Trace
the three leaves onto the paper side of the fusible webbing. Cut around the
design leaving 0.5 cm clearance. Position the leaves onto the wrong side of
some green checked fabric and press in place with an iron following the manufacturer’s
directions. Cut out the leaves and remove the paper backing.
Position the apples and leaves on
the lower half of the bib as shown in the photo and press in place. Stitch
around each shape with black thread using free motion embroidery, close to the
edge. Stitch around each shape three times to secure and stitch through to the
flannel layer. Stitch a stem on each apple. Pull threads to the back, tie them
off and trim.
I found a lot of bib
patterns! So, here is another link http://www.aspoonfulofsugardesigns.com/2010/06/boutique-baby-bibs.html
This blog is getting too long and
blogger has a hard time with length a cool link to DIY Car Seat Cover http://simplydesigning.blogspot.com/2010/01/diy-car-seat-cover.html
Share your ideas on this or anything here on the blog either here or
e-mail me at stipple@verizon.net. I look
forward to hearing from you!
Sandi
No comments:
Post a Comment